

How To Install A Subfloor Over Concrete
How-to install a wood subfloor over concrete
Protect your basement from a cold and clammy concrete floor
You demand a dry, clean and flat surface before you can install finished flooring in a room built on a concrete slab. One of the simplest options is a sleeper-based subfloor. The result is a subfloor that protects finished flooring from cold and clammy concrete-based floors.
Difficulty level: Intermediate
Duration: Weekend
Subfloor options
Some garage flooring options are designed to be installed directly on a concrete surface. Others require some type of subfloor to protect them from the furnishings of cold, clammy physical. Check the flooring manufacturer's installation instructions before you brand your selection.
Go to the article: "Is a subfloor necessary in the basement?" Information technology will aid you choose the right subfloor for your needs. Follow our helpful tips below before installing engineered floor panels in your basement:
Before yous begin
-
Check your local building code, and pay special attending to rules concerning vapor barriers, bridge ratings (subfloor thickness) and floor drains.
-
Employ a digital moisture detector to measure the moisture content (MC) of the physical slab.
-
Read the flooring manufacturer'south guidelines for the product you plan to install, and pay particular attention to requirements as regards the construction and wet content of the concrete slab.
-
Manufacturers may require sub-floor and flooring materials to be acclimated prior to installation (generally 24-72 hours).
-
Wearable eye protection and work gloves, and use an canonical dust mask or respirator when cut pressure level-treated woods.
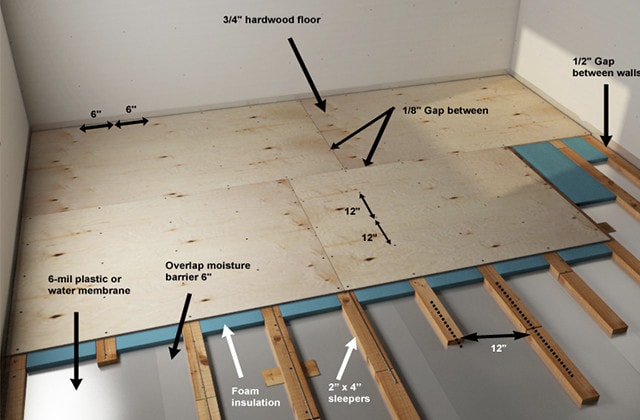
Components of a wood subfloor
Hither are the components of a sleeper-and-wood subfloor:
-
Plastic or h2o membrane
-
Foam insulation
-
2" x iv" sleepers
-
three/four" hardwood floor
Calculate the surface and determine the layout
1
Calculate the materials required and establish a plan
-
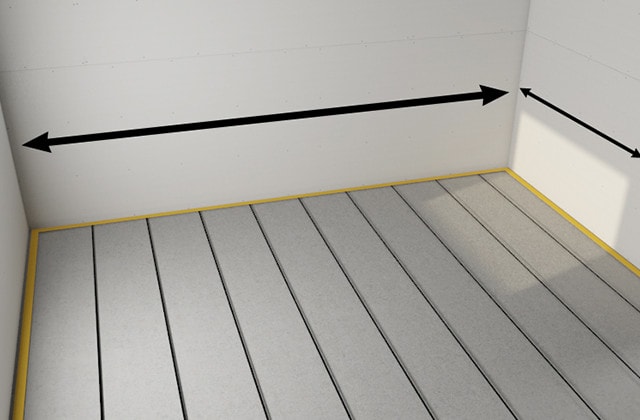
1.1 - Measure the length and width of the room and brand a layout program.
-
1.2 - Calculate the total area of the room (length multiplied by width) which will indicate the quantities of vapour bulwark, plywood and insulation you will need.
-
ane.3 - On your plan, draw the location of sleepers around the perimeter of the room and calculate the number required (multiples of 8ꞌ and 12ꞌ)
-
1.iv - On the programme, describe parallel sleepers located 12" on center and calculate the number required.
-
1.5 - Add 10% to total quantities of materials in case of fault or defective pieces
Make your life easier
Our converters can be a big help in computing the quantity of materials you need.
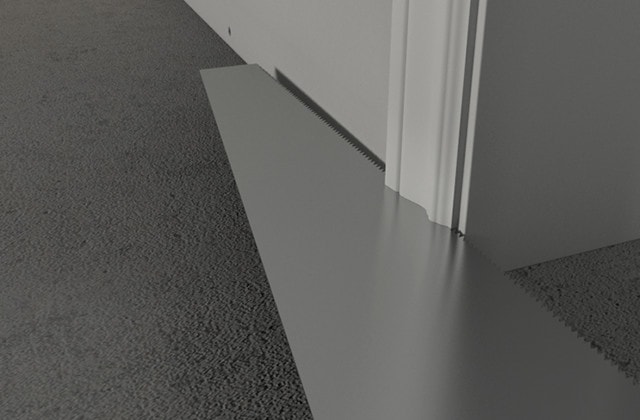
Cut casings to the level of the new floor.
-
two.1 - two.1. Remove existing baseboards, moulding and doorway thresholds.
-
2.2 - 2.2. Measure the combined thickness of the subfloor (sleepers and wood panels) and finished floorcovering.
-
two.3 - 2.3. With a saw or oscillating tool, cut door casings and jambs to ane/16" above the level of where the finished floor will exist.
-
ii.4 - 2.iv. If needed, remove doors and use a circular saw to cut 1/8" above the level of where the finished floor will be. (The bottom of a hollow-cadre door can but be cutting to a limited extent. Never cut the top of the door.
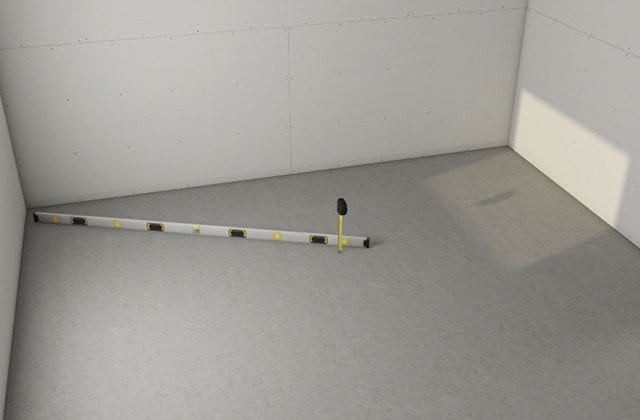
Identify high and low spots
3
Bank check for flatness and clean the slab
-
3.1 - With a long metal straightedge, identify dips or high spots that exceed recommended tolerances for the floor you lot are installing (usually within a variance of three/16" every ten feet or 1/8" every half dozen anxiety).
-
3.2 - Apply a concrete grinder to level high spots.
-
iii.3 - Make full low spots with self-levelling compound or Portland cement. Follow the compound manufacturer'due south recommendations regarding surface preparation, mixing and drying fourth dimension.
-
3.iv - Sweep, vacuum and remove debris such as drywall compound, paint, clay, adhesives, tack strips, staples and loose concrete.
-
3.5 - Fill cracks with physical filler and smoothen out the surface with the flat edge of a trowel.
-
3.vi - Permit the filler cure, then seal with water-based polyurethane.
Install the polyethylene vapour barrier
4
Install the vapour bulwark
-
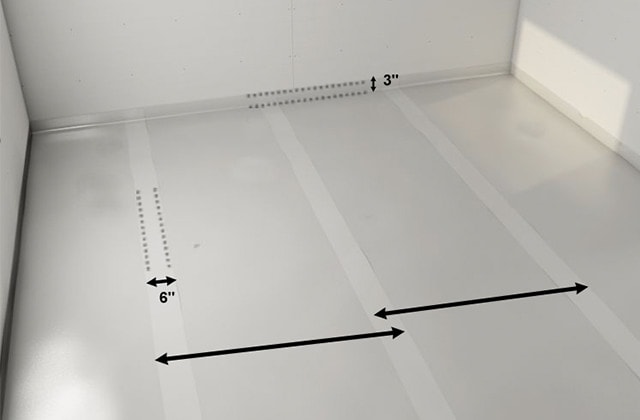
4.1 - Cover the slab with polyethylene sheeting, overlapping seams by at least 6".
-
iv.2 - Extend approximately 3" of polyethylene upwardly the walls around the entire perimeter of the room.
-
4.3 - Seal the seams, edges and whatever tears with blue 60 mm sheating tape.
Pro Tip
For additional protection, utilise a "skim" glaze of cobblestone mastic to the slab with the direct edge of a trowel. After well-nigh 30 minutes, the polyethylene sheeting tin exist rolled over the mastic by walking over the film, embedding it in the mastic.
Space 12" sleepers on centre
-
v.1 - Lay flat the force per unit area-treated ii" x 3"s around the entire perimeter of the room, maintaining a ½" expansion gap between each 2" x 3" and the walls.
-
5.2 - Use shims to level if necessary, and if several thicknesses are required, glue shims together.
-
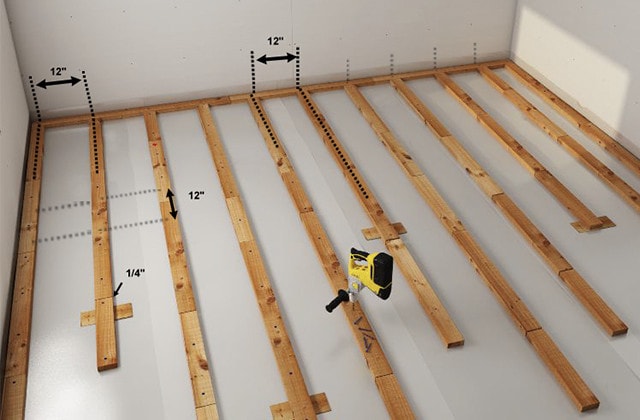
5.3 - Screw each sleeper at least 2" into the concrete slab. Space screws 24" apart. Screw heads should lie flush with or just below the surface of the sleepers.
-
5.4 - Lay 2" ten iii"due south in parallel rows 12" apart on-center, perpendicular to the management of your finished floor. Butt the joints, leaving a ¼" expansion gap.
-
five.5 - Ensure the sleepers are level, and shim if necessary.
-
5.half dozen - Spike the sleepers to the concrete at 12" intervals.
Add insulation betwixt the sleepers
six
Position insulation panels
-
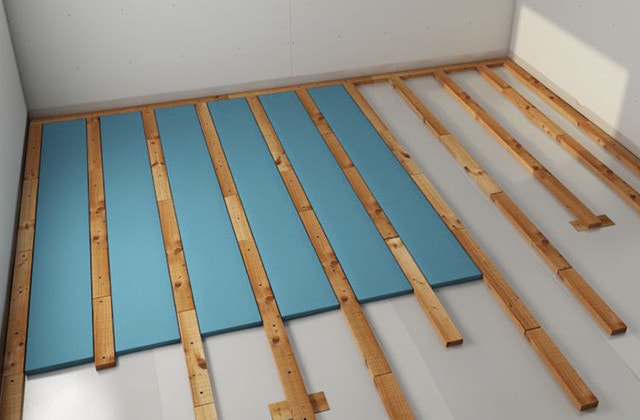
6.1 - Measure the spaces to be filled between the sleepers.
-
6.2 - Marker the cut lines on the insulation panels
-
6.3 - Use a utility knife and metal straightedge to score the foam insulation.
-
6.four - Turn over the scored foam console. Press hard against the back (uncut side) of the scored cut for a clean break.
-
6.5 - Do the aforementioned for all panels and place them between the sleepers, on the vapor barrier.
Secure the subfloor to the sleepers
7
Screw in the plywood subflooring
-
7.1 - Cheque the plywood panels for chipped tongue-and-groove edges.
-
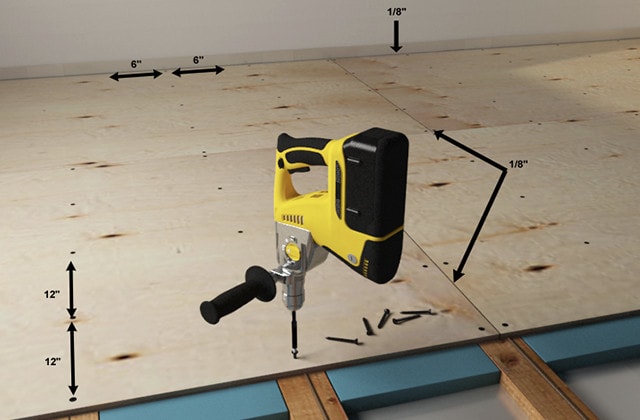
7.two - Measure and cut the plywood panels so interlocking joints meet at the centre of the sleepers. Stagger the joints so no articulation runs into some other articulation.
-
7.3 - Before you lot place each panel, apply a bead of construction agglutinative to the meridian of the sleepers.
-
vii.four - Maintain a 1/viii" expansion gap effectually the perimeter.
-
7.5 - Spike each plywood console to the sleepers using flooring screws: every 6" around the edges and every 12" along intermediate sleepers.
-
7.6 - Clean the plywood subfloor surface earlier you install the flooring.

Source: https://www.rona.ca/en/workshop/diy/install-wood-subfloor-concrete-slab
Posted by: gladneypolet1982.blogspot.com
0 Response to "How To Install A Subfloor Over Concrete"
Post a Comment