

How To Install Custom Recovery With Odin
Magisk
Installation
If y'all already accept Magisk installed, it is strongly recommended to upgrade direct via the Magisk app using its "Direct Install" method. The post-obit tutorial is only for the initial installation.
Getting Started
Earlier you start:
- This tutorial assumes you understand how to utilize
adbandfastboot - If you lot plan to too install custom kernels, install information technology afterward Magisk
- Your device's bootloader has to be unlocked
Download and install the latest Magisk app. In the home screen, you should see:
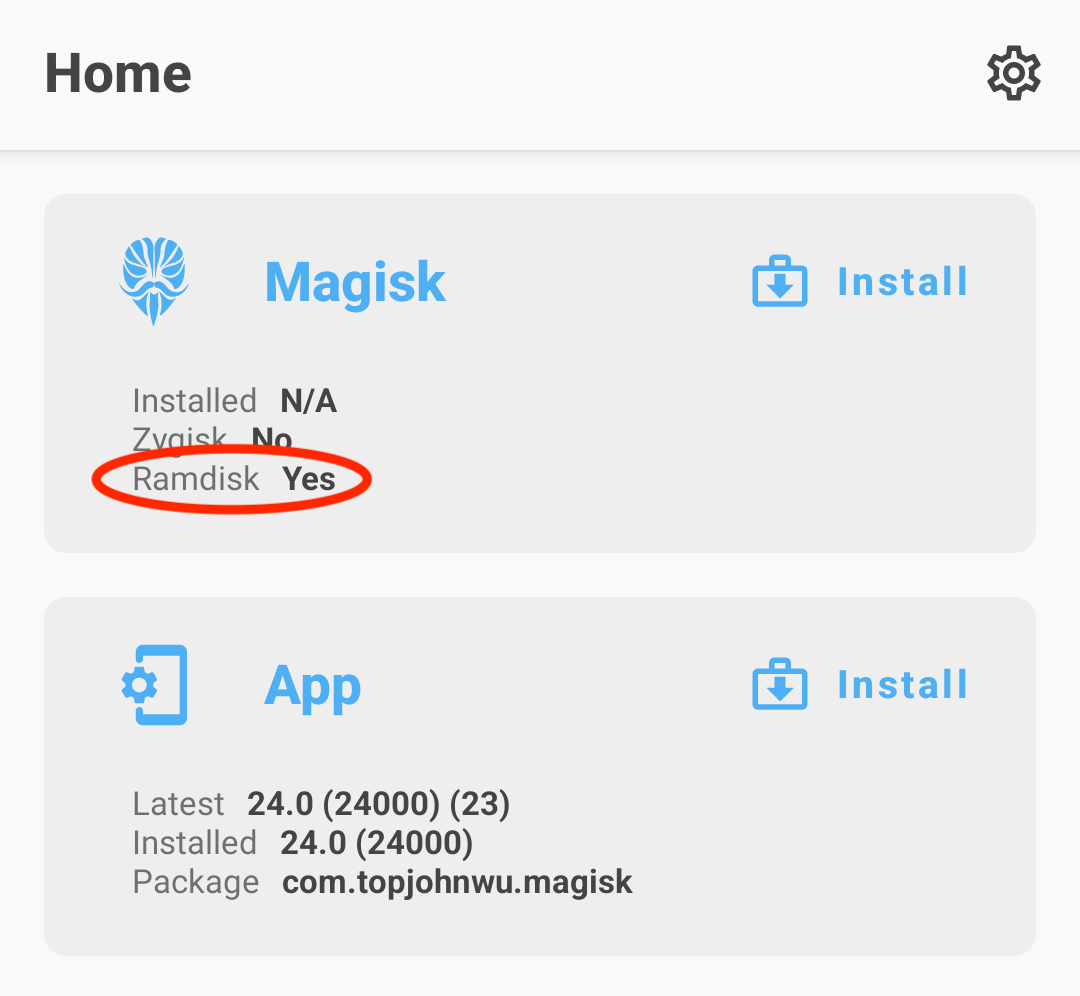
The result of Ramdisk determines whether your device has ramdisk in the boot sectionalisation. If your device does not have kick ramdisk, read the Magisk in Recovery section before continuing.
(Unfortunately, in that location are exceptions as some devices' bootloader accepts ramdisk even if it shouldn't. In this example, you lot will have to follow the instructions equally if your device's boot division does include ramdisk. There is no fashion to discover this, and then the only way to know for certain is to really try. Fortunately, as far as we know, only some Xiaomi devices are known to have this holding, so most people tin only ignore this piece of data.)
If you are using a Samsung device that is launched with Android ix.0 or higher, you can now jump to its own section.
If your device has boot ramdisk, get a copy of the kick.img.
If your device does NOT take kick ramdisk, get a copy of the recovery.img.
You should exist able to extract the file you lot demand from official firmware packages or your custom ROM zippo.
Adjacent, we need to know whether your device has a separate vbmeta sectionalisation.
- If your official firmware packet contains
vbmeta.img, then yes, your device has a split upvbmetapartitioning - You can likewise bank check by connecting your device to a PC and run the command:
adb shell ls -l /dev/block/by-proper noun - If you lot discover
vbmeta,vbmeta_a, orvbmeta_b, then yes, your device has a separatevbmetasectionalisation - Otherwise, your device does not have a split
vbmetasectionalisation.
Quick recap, at this betoken, you lot should take known and prepared:
- Whether your device has boot ramdisk
- Whether your device has a separate
vbmetadivision - A
kicking.imgorrecovery.imgbased on (i)
Permit'southward keep to Patching Images.
Patching Images
- Copy the boot/recovery image to your device
- Press the Install button in the Magisk carte
- If you are patching a recovery image, cheque the "Recovery Mode" option
- If your device does NOT accept a separate
vbmetapartition, check the "Patch vbmeta in kick epitome" option - Choose "Select and Patch a File" in method, and select the kick/recovery image
- Start the installation, and re-create the patched image to your PC using ADB:
adb pull /sdcard/Download/magisk_patched_[random_strings].img - Flash the patched boot/recovery image to your device.
For most devices, reboot into fastboot mode and flash with command:
fastboot flash boot /path/to/magisk_patched.imgor
fastboot flash recovery /path/to/magisk_patched.img - (Optional) If your device has a separate
vbmetapartition, you can patch thevbmetapartition with control:
fastboot flash vbmeta --disable-verity --disable-verification vbmeta.img - Reboot and voila!
Uninstallation
The easiest way to uninstall Magisk is directly through the Magisk app. If you insist on using custom recoveries, rename the Magisk APK to uninstall.nix and flash information technology like any other ordinary flashable zippo.
Magisk in Recovery
In the case when your device does not have ramdisk in kicking images, Magisk has no choice but to hijack the recovery sectionalisation. For these devices, y'all volition have to reboot to recovery every fourth dimension yous want Magisk enabled.
When Magisk hijacks the recovery, there is a special mechanism to allow you to actually boot into recovery mode. Each device model has its own key philharmonic to kicking into recovery, equally an example for Milky way S10 information technology is (Power + Bixby + Volume Upwardly). A quick search online should easily get you this info. Every bit presently every bit you press the key combo and the device vibrates with a splash screen, release all buttons to kick into Magisk. If yous make up one's mind to boot into the actual recovery mode, long press volume upwards until y'all encounter the recovery screen.
As a summary, after installing Magisk in recovery (starting from power off):
- (Power upwards unremarkably) → (Arrangement with NO Magisk)
- (Recovery Central Combo) → (Splash screen) → (Release all buttons) → (Arrangement with Magisk)
- (Recovery Key Philharmonic) → (Splash screen) → (Long press book up) → (Recovery Fashion)
(Note: You CANNOT use custom recoveries to install or upgrade Magisk in this case!!)
Samsung (Organization-every bit-root)
If your Samsung device is Non launched with Android 9.0 or college, y'all are reading the wrong department.
Before Installing Magisk
- Installing Magisk WILL trip KNOX
- Installing Magisk for the first time REQUIRES a full data wipe (this is NOT counting the data wipe when unlocking bootloader). Backup your data earlier proceed.
- Download Odin (only runs on Windows) that supports your device.
Unlocking Bootloader
Unlocking the bootloader on modern Samsung devices have some caveats. The newly introduced VaultKeeper service volition brand the bootloader refuse whatever unofficial partitions in some circumstances.
- Let bootloader unlocking in Programmer options → OEM unlocking
- Reboot to download manner: ability off your device and press the download way central combo for your device
- Long printing volume up to unlock the bootloader. This volition wipe your information and automatically reboot.
- Go through the initial setup. Skip through all the steps since data will exist wiped again in after steps. Connect the device to Cyberspace during the setup.
- Enable developer options, and ostend that the OEM unlocking option exists and is grayed out. This ways the
VaultKeeperservice has unleashed the bootloader. - Your bootloader now accepts unofficial images in download manner
Instructions
- Employ either samfirm.js, Frija, or Samloader to download the latest firmware zip of your device directly from Samsung servers.
- Unzip the firmware and copy the
APtar file to your device. Information technology is normally named every bitAP_[device_model_sw_ver].tar.md5 - Press the Install button in the Magisk carte
- If your device does NOT accept kick ramdisk, bank check the "Recovery Mode" option
- Choose "Select and Patch a File" in method, and select the
APtar file - Start the installation, and copy the patched tar file to your PC using ADB:
adb pull /sdcard/Download/magisk_patched_[random_strings].tar
Do NOT Utilize MTP as it is known to corrupt large files. - Reboot to download mode. Open Odin on your PC, and flash
magisk_patched.tarevery bitAP, together withBL,CP, andCSC(NonHOME_CSCbecause we want to wipe data) from the original firmware. - Your device should reboot automatically in one case Odin finished flashing. Agree to do a manufactory reset if asked.
- If your device does Not have kicking ramdisk, reboot to recovery now to enable Magisk (reason stated in Magisk in Recovery).
- Install the Magisk app you've already downloaded and launch the app. It should show a dialog request for boosted setup.
- Let the app do its job and automatically reboot the device. Voila!
Upgrading the Bone
Once you lot have rooted your Samsung device, you tin can no longer upgrade your Android OS through OTA. To upgrade your device's OS, yous have to manually download the new firmware zip file and go through the same AP patching process written in the previous section. The only difference here is in the Odin flashing step: exercise NOT use the CSC tar, but instead employ the HOME_CSC tar every bit we are performing an upgrade, not the initial install.
Important Notes
- Never, ever try to restore either
boot,recovery, orvbmetapartitions back to stock! You can brick your device by doing so, and the only way to recover from this is to exercise a total Odin restore with data wipe. - To upgrade your device with a new firmware, NEVER straight employ the stock
APtar file with reasons mentioned above. Always patchAPin the Magisk app and use that instead. - Never just wink simply
AP, or else Odin may shrink your/informationfilesystem size. FlashAP+BL+CP+HOME_CSCwhen upgrading.
Custom Recovery
This installation method is deprecated and is maintained with minimum effort. YOU Take BEEN WARNED!
Installing using custom recoveries is only possible if your device has boot ramdisk. Installing Magisk through custom recoveries on modern devices is no longer recommended. If yous face whatsoever bug, please utilize the proper Patch Image method.
- Download the Magisk APK
- Rename the
.apkfile extension to.nada, for case:Magisk-v24.0.apk→Magisk-v24.0.naught. If you have trouble renaming the file extension (similar on Windows), apply a file manager on Android or the one included in TWRP to rename the file. - Flash the zip only like any other ordinary flashable naught.
- Reboot and check whether the Magisk app is installed. If it isn't installed automatically, manually install the APK.
Warning: the
sepolicy.dominionfile of modules may be stored in thecachepartition. Practise NOT WIPE THEEnshroudSegmentation.

Source: https://topjohnwu.github.io/Magisk/install.html
Posted by: gladneypolet1982.blogspot.com
0 Response to "How To Install Custom Recovery With Odin"
Post a Comment